Manage Saved Product Control Reports
Table of Contents
Portal administrators and managers can create, save, edit and delete product control reports as needed to easily export waste tracking reporting from the Product Control tab in the portal.
Save a Saved Report
1. Login to www.datecodegenie.com using the recommended browser, see Supported Internet Browser for Portal Access
2. Click on the Product Control tab on the sidebar.

3. Select and set the filter fields needed for the report to save.
NOTE
Data in the Print Job ID column will only appear if the Sort by is set to Print Job ID (New Format).

4. Click the Select Columns button.

5. Click Select all.

6. Click Deselect all.

7. Checkmark which columns to display in the report. Click Apply.

TIPS & TRICKS
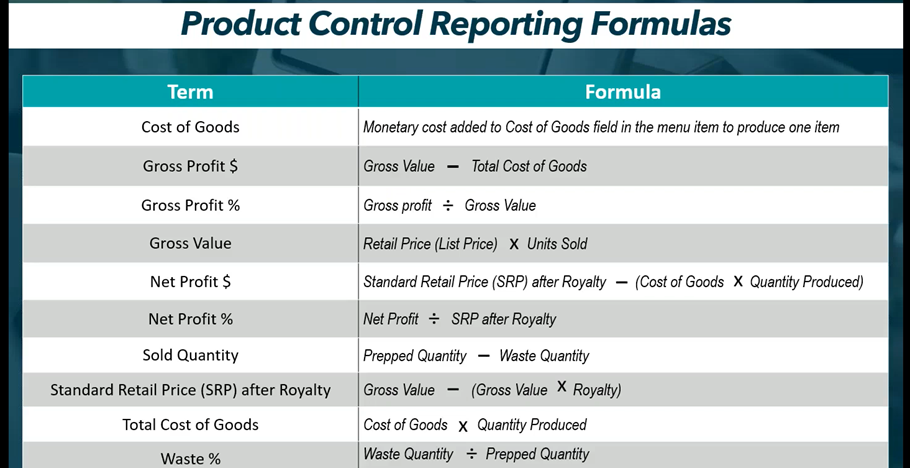
Use the formulas from the table below to help decide which columns to display.
7. Click Save Report As, enter the new Report Name and click Submit.


8. Click the Select Report dropdown to view the saved report.

Edit a Saved Report
1. Click on the Select Report dropdown menu and select the saved report.

2. Edit any filters needed on the top of the page for this saved report.

3. Click the Select Columns button and add or remove the necessary check marks to update the data to appear on the report.

4. Click the Save Report As button.

5. Enter the new Report Name and click Submit.

Delete a Saved Report
1. Click the Delete Report button.

2. Click Delete Report to permanently remove the saved report.

Run a Saved Report
1. Click the Select Report dropdown menu to select the saved report to run.
2. Adjust the filters at the top of the page if needed.
3. Click Export to generate the report.